Tuesday, June 14, 2011

Understanding Directory Structure and Various Files in Liferay Portlet Plugin

Share |
<b>Understanding directory structure and various files of Portlet Project </b>
A portlet project is made up at a minimum of three components:
1. Java Source
2. Configuration files
3. Client-side files (*.jsp, *.css, *.js, graphics, etc.)
These files are stored in a standard directory structure which looks
like the following:
 
/<portlet-name>/
                     build.xml
                     /docroot/
                     /css/
                     /js/
       /tld/
                     /WEB-INF/
                             /src/ (not created by default)
                             liferay-display.xml
                             liferay-plugin-package.properties
                             iferay-portlet.xml
                             portlet.xml
                             web.xml
                      icon.png
                      view.jsp
New portlets are configured by default to use the <b>MVCPortlet</b> framework, which uses separate JSPs for each page in the portlet, and for each of the three portlet modes: view, edit, and help. The <b>Java Source</b> is stored in the <b>docroot/WEB-INF/src</b> folder. The <b>Configuration Files</b> are stored in the <b>docroot/WEB-INF</b> folder. The standard JSR-286 portlet configuration file  

portlet.xml can be found in this folder, as well as three Liferay specific portlet configuration files are located in this folder. The Liferay specific configuration files are completely optional, but are important if your portlets are going to be deployed on a Liferay Portal server.

liferay-display.xml: This file describes the category in which the portlet should appear under in the Add menu.

liferay-portlet.xml: This file describes some optional Liferay-specific enhancements for JSR-286 portlets which user can configure when that are installed on a Liferay Portal server. For example, you can set whether a portlet is instanceable or not, which means that you can place more than one instance on a page, and each portlet will have its own separate data. Please see the DTD for this file for further details, as there are too many settings to list here. The DTD may be found in the definitions folder in the Liferay source code.

liferay-plugin-package.properties: This file describes the plugin to Liferay's hot deployer. One of the things that can be configured in this file is dependency .jars. If a portlet plugin has dependencies on particular .jar files that already come with Liferay, you can specify them in this file and the hot deployer will modify the .war file on deployment so that those .jars are on the class path.

Client Side Files are the .jsp, .css, and JavaScript files that you write to implement your portlet's user interface. These files should go in the docroot folder somewhere—either in the root of the folder or in a folder structure of their own. Remember that with portlets you are only dealing with a portion of the HTML document that is getting returned to the browser. Any HTML code you have in your client side files should be free of global tags such as <html> or <head>. Additionally, all CSS classes and element IDs must be namespaced with the portlet ID to prevent conflicts with other portlets or multiple instance of the same portlet.

Share |

Monday, June 13, 2011

Liferay Portlet : How to Create, Deploy and Customize portlets in Liferay?

Share |
It is very simple to create, deploy and customize the portlet in Liferay. Before you start working on portlet with Liferay please make sure you have installed JDK, ANT, Liferay portal and Liferay Plugins SDK on your machine.
Create and Deploy portlet with Liferay Plugins SDK: (Step by Step guide to Create and Deploy portlet using Liferay Plugins SDK)

- Go to <Liferay Plugins Install Directory>/portlets and give following command to create portlet

For Linux, Unix and Mac OS X:
./create.sh <portlet-name> "portlet display name"

For all windows platforms:
create.bat <portlet-name> "portlet display name"

- This will create portlet plugin in directory -porltet e.g. if portlet name is hello-world then hello-world-portlet directory will be created in <Liferay Plugins Install Directory>/portlets directory

- To deploy the portlet go to newly created portlet's directory in command prompt / terminal and give following command
ant deploy

- Note: make sure your Liferay portal is running at this time or else you can start it, to see the deployed portlet.

- By default newly created portlets gets added to Sample category, you can add this portlet to any page of the Liferay.

If you are facing problem in creation or deployment of portlet then please visit "How to create and deploy Liferay portlet using Liferay plugins SDK?" here

Understanding directory structure and various files of Portlet Project
A portlet project is made up at a minimum of three components:
1. Java Source
2. Configuration files
3. Client-side files (*.jsp, *.css, *.js, graphics, etc.)
These files are stored in a standard directory structure which looks
like the following:
 
/<portlet-name>/
                     build.xml
                     /docroot/
                     /css/
                     /js/
       /tld/
                     /WEB-INF/
                             /src/ (not created by default)
                             liferay-display.xml
                             liferay-plugin-package.properties
                             iferay-portlet.xml
                             portlet.xml
                             web.xml
                      icon.png
                      view.jsp
New portlets are configured by default to use the MVCPortlet framework, which uses separate JSPs for each page in the portlet, and for each of the three portlet modes: view, edit, and help. The Java Source is stored in the docroot/WEB-INF/src folder. The Configuration Files are stored in the docroot/WEB-INF folder. The standard JSR-286 portlet configuration file portlet.xml is here, as well as three Liferay specific configuration files:
1) liferay-display.xml : User add portlet into specific category in portlet catalog
2) liferay-portlet.xml: Liferay specific extensive configuration of portlet
3) liferay-plugin-package.properties: User by Liferay hot deployer for plugins.
Note: To read more details about directory structure of Liferay portlet project visit here


Following are default configuration files for Hello World portlet

portlet.xml


<?xml version="1.0"?>

<portlet-app version="2.0" xmlns="http://java.sun.com/xml/ns/portlet/portlet-app_2_0.xsd" xmlns:xsi="http://www.w3.org/2001/XMLSchema-instance"
    xsi:schemaLocation="http://java.sun.com/xml/ns/portlet/portlet-app_2_0.xsd http://java.sun.com/xml/ns/portlet/portlet-app_2_0.xsd">
    <portlet>
        <portlet-name>hello-word</portlet-name>
        <display-name>Hello World</display-name>
        <portlet-class>com.liferay.util.bridges.mvc.MVCPortlet</portlet-class>
        <init-param>
            <name>view-jsp</name>
            <value>/view.jsp</value>
        </init-param>
        <expiration-cache>0</expiration-cache>
        <supports>
            <mime-type>text/html</mime-type>
        </supports>
        <portlet-info>
            <title>Hello World</title>
            <short-title>Hello World</short-title>
            <keywords>Hello World</keywords>
        </portlet-info>
        <security-role-ref>
            <role-name>administrator</role-name>
        </security-role-ref>
        <security-role-ref>
            <role-name>guest</role-name>
        </security-role-ref>
        <security-role-ref>
            <role-name>power-user</role-name>
        </security-role-ref>
        <security-role-ref>
            <role-name>user</role-name>
        </security-role-ref>
    </portlet>
</portlet-app>

liferay-portlet.xml
 
<?xml version="1.0"?>
<!DOCTYPE liferay-portlet-app PUBLIC "-//Liferay//DTD Portlet Application 6.0.0//EN" "http://www.liferay.com/dtd/liferay-portlet-app_6_0_0.dtd">

<liferay-portlet-app>
    <portlet>
        <portlet-name>hello-word</portlet-name>
        <icon>/icon.png</icon>
        <instanceable>true</instanceable>
        <header-portlet-css>/css/main.css</header-portlet-css>
        <footer-portlet-javascript>/js/main.js</footer-portlet-javascript>
        <css-class-wrapper>hello-word-portlet</css-class-wrapper>
    </portlet>
    <role-mapper>
        <role-name>administrator</role-name>
        <role-link>Administrator</role-link>
    </role-mapper>
    <role-mapper>
        <role-name>guest</role-name>
        <role-link>Guest</role-link>
    </role-mapper>
    <role-mapper>
        <role-name>power-user</role-name>
        <role-link>Power User</role-link>
    </role-mapper>
    <role-mapper>
        <role-name>user</role-name>
        <role-link>User</role-link>
    </role-mapper>
</liferay-portlet-app>

liferay-display.xml
 
<?xml version="1.0"?>
<!DOCTYPE display PUBLIC "-//Liferay//DTD Display 6.0.0//EN" "http://www.liferay.com/dtd/liferay-display_6_0_0.dtd">

<display>
    <category name="category.sample">
        <portlet id="hello-word" />
    </category>
</display>


liferay-plugin-package.properties
 
name=Hello World
module-group-id=liferay
module-incremental-version=1
tags=
short-description=
change-log=
page-url=http://www.liferay.com
author=Liferay, Inc.
licenses=LGPL

view.jsp
 
<%
/**
 * Copyright (c) 2000-2010 Liferay, Inc. All rights reserved.
 *
 * This library is free software; you can redistribute it and/or modify it under
 * the terms of the GNU Lesser General Public License as published by the Free
 * Software Foundation; either version 2.1 of the License, or (at your option)
 * any later version.
 *
 * This library is distributed in the hope that it will be useful, but WITHOUT
 * ANY WARRANTY; without even the implied warranty of MERCHANTABILITY or FITNESS
 * FOR A PARTICULAR PURPOSE. See the GNU Lesser General Public License for more
 * details.
 */
%>

<%@ taglib uri="http://java.sun.com/portlet_2_0" prefix="portlet" %>

<portlet:defineObjects />

This is the <b>Hello World</b> portlet.

We can remove or customize copyright javadoc message to as per our requirements or remove it. Other than this there will be two empty files created at docroot/js/main.js for adding custom javascripts and docroot/css/main.css to specify custom css configurations.

Customizing Portlet
  • Make sure instanceable property is set to true for hello-world portlet in liferay-portlet.xml. 
  • Now, we want customize portlet for user to input the customized greeting message in the edit mode of the portlet and in view mode it should display greeting message to that user.
  • For this, change the content of view.jsp as follows:
     
    <%@ taglib uri="http://java.sun.com/portlet_2_0" prefix="portlet" %>
    <%@ page import="javax.portlet.PortletPreferences" %>
    <portlet:defineObjects />
    
    This is the <b>Hello World</b> portlet.
    <br/>
    <%
    PortletPreferences prefs = renderRequest.getPreferences();
    String greeting = (String)prefs.getValue("greeting", "Hello! Welcome to our portal.");
    %>
    <p><%= greeting %></p>
    <portlet:renderURL var="editGreetingURL">
    <portlet:param name="jspPage" value="/edit.jsp" />
    </portlet:renderURL>
    <p><a href="<%= editGreetingURL %>">Edit greeting</a></p>
  • Next, create edit.jsp in the same directory as view.jsp with the following content:
     
    <%@ taglib uri="http://java.sun.com/portlet_2_0" prefix="portlet" %>
    <%@ taglib uri="http://liferay.com/tld/aui" prefix="aui" %>
    <%@ page import="com.liferay.portal.kernel.util.ParamUtil" %>
    <%@ page import="com.liferay.portal.kernel.util.Validator" %>
    <%@ page import="javax.portlet.PortletPreferences" %>
    
    <portlet:defineObjects />
    
    <%
    PortletPreferences prefs = renderRequest.getPreferences();
    String greeting = ParamUtil.getString(renderRequest, "greeting");
    if (Validator.isNotNull(greeting)) {
    prefs.setValue("greeting", greeting);
    prefs.store();
    %>
    
    <p>Greeting saved successfully!</p>
    <%
    }
    %>
    <%
        greeting = (String)prefs.getValue("greeting", "Hello! Welcome to our portal.");
    %>
    
    <portlet:renderURL var="editGreetingURL">
    <portlet:param name="jspPage" value="/edit.jsp" />
    </portlet:renderURL>
    
    <aui:form action="<%= editGreetingURL %>" method="post">
         <aui:input label="greeting" name="greeting" type="text" value="<%=greeting %>" />
         <aui:button type="submit" />
    </aui:form>
    
    <portlet:renderURL var="viewGreetingURL">
    <portlet:param name="jspPage" value="/view.jsp" />
    </portlet:renderURL>
    
    <p><a href="<%= viewGreetingURL %>">&larr; Back</a></p>
    
    
  • After this once again deploy the portlet by going to portlet project directory (portlet/hello-world-protelt) at command prompt and execute command ant deploy
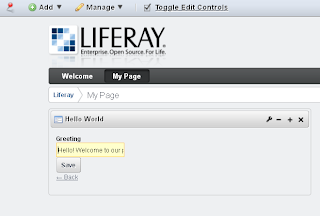
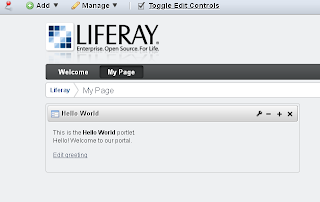
  •  Now check the portal's console once it logs that portlet is deployed successfully. Go to browser and add our Hello World portlet form Sample category to page, which is displayed as follows
  • You can click on edit greeting link and view the page to change the greetings message.  
  • Here change your customized greetings message then click on Save button. Which saves the customized greeting message and then click on the back link to switch back to view mode of portlet.Now you can see the custom greeting message as follows:

You can download the portlet project for the hello world example here and extract this to portlets directory of your plugin.
Share |

Friday, June 10, 2011

Setup Liferay Development Environment | Install Liferay Plugin SDK

Share |
If you want to develop plugins (portlet, theme, hook, ext, layout template) for Liferay to customize Liferay, you need to install plug-in SDK for Liferay. You can download Liferay plugin SDK form http://www.liferay.com/downloads/liferay-portal/available-releases

Requirements and steps to install Liferay Plugins SDK
- You must have JDK 1.5 or higher installed on your machine
- You must have already installed Liferay portal with any Application server. (Note: visit here for guidelines of installed Liferay portal)
- Make sure you download Liferay portal and Liferay Plug-in SDK with same version
- Now create "plugins" or "liferay-plugins" directory at the same level where <liferay portal directory> is located. e.g. if Liferay portal is installed at C:\liferay\liferay-portal-X.X.X then create directory C:\liferay\plugins and extract the content of liferay-plugins-sdk-X.X.X.zip into C:\liferay\plugins directory.
- This will install Liferay plugins SDK / Liferay development environment into your machine.

Setup / customize Liferay Plugin SDK build properties based on your application server
- Once you finish installation of Liferay Plugin SDK, you can go to its installation directory, e.g. C:\liferay\plugins. Here you can find file build.properties, you can either edit this file directly or preferably create copy of this file with name build.<username>.properties (e.g. my username is tejash then I will create copy of the file with name build.tejash.properties)
- Then edit the newly created build.<username>.properties by default content of this file would be as follows:

 
##
## DO NOT EDIT THIS FILE.
##
## To update the properties of this file, create a separate properties file
## named "build.${user.name}.properties" with the properties to overwrite.
##

##
## Application Server
##

    #
    # The default settings are for Tomcat. Additional settings are left
    # commented out as examples.
    #

    #
    # Specify the paths to an unzipped Geronimo bundle.
    #
    #app.server.type=geronimo
    #app.server.dir=${project.dir}/../bundles/geronimo-2.2.0
    #app.server.deploy.dir=${app.server.dir}/deploy
    #app.server.lib.global.dir=${app.server.dir}/var/shared/lib
    #app.server.portal.dir=${app.server.dir}/deploy/liferay-portal.war

    #
    # Specify the paths to an unzipped Glassfish bundle.
    #
    #app.server.type=glassfish
    #app.server.dir=${project.dir}/../bundles/glassfish-3.0.0
    #app.server.deploy.dir=${app.server.dir}/autodeploy
    #app.server.lib.global.dir=${app.server.dir}/domains/domain1/lib
    #app.server.portal.dir=${app.server.dir}/domains/domain1/applications/liferay-portal

    #
    # Specify the paths to an unzipped JBoss bundle.
    #
    #app.server.type=jboss
    #app.server.dir=${project.dir}/../bundles/jboss-5.1.0
    #app.server.deploy.dir=${app.server.dir}/server/default/deploy
    #app.server.lib.global.dir=${app.server.dir}/server/default/lib/ext
    #app.server.portal.dir=${app.server.dir}/server/default/deploy/ROOT.war

    #
    # Specify the paths to an unzipped Jetty bundle.
    #
    #app.server.type=jetty
    #app.server.dir=${project.dir}/../bundles/jetty-6.1.23
    #app.server.deploy.dir=${app.server.dir}/webapps
    #app.server.lib.global.dir=${app.server.dir}/lib/liferay
    #app.server.portal.dir=${app.server.dir}/webapps/root

    #
    # Specify the paths to an unzipped JOnAS bundle.
    #
    #app.server.type=jonas
    #app.server.dir=${project.dir}/../bundles/jonas-5.1.1
    #app.server.deploy.dir=${app.server.dir}/deploy
    #app.server.lib.global.dir=${app.server.dir}/lib/ext
    #app.server.portal.dir=${app.server.dir}/deploy/liferay-portal.war

    #
    # Specify the paths to an unzipped Resin bundle.
    #
    #app.server.type=resin
    #app.server.dir=${project.dir}/../bundles/resin-3.1.9
    #app.server.deploy.dir=${app.server.dir}/webapps
    #app.server.lib.global.dir=${app.server.dir}/ext-lib
    #app.server.portal.dir=${app.server.dir}/webapps/ROOT

    #
    # Specify the paths to an unzipped Tomcat bundle.
    #
    app.server.type=tomcat
    app.server.dir=${project.dir}/../bundles/tomcat-6.0.26
    app.server.deploy.dir=${app.server.dir}/webapps
    app.server.lib.global.dir=${app.server.dir}/lib/ext
    app.server.portal.dir=${app.server.dir}/webapps/ROOT

##
## Auto Deploy
##

    #
    # Plugins will be deployed to this directory. Make sure that Liferay is
    # also set to scan this directory.
    #
    auto.deploy.dir=${app.server.dir}/../deploy

##
## Compiler
##

    ant.build.javac.source=1.5
    ant.build.javac.target=1.5

    javac.compiler=modern
    #javac.compiler=org.eclipse.jdt.core.JDTCompilerAdapter

    javac.debug=on
    javac.deprecation=off
    javac.fork=true
    javac.memoryMaximumSize=256m
    javac.nowarn=on

##
## Database
##

    #
    # Set the database name used by the SQL scripts.
    #
    database.name=lportal

    #
    # Set the database server types to build SQL scripts for.
    #
    database.types=db2,derby,firebird,hypersonic,informix,ingres,interbase,jdatastore,mysql,oracle,postgresql,sap,sqlserver,sybase
    #database.types=mysql

##
## Extension Environment
##

    #ext.work.dir=

##
## Libraries
##

    required.portal.jars=commons-logging.jar,log4j.jar,util-bridges.jar,util-java.jar,util-taglib.jar

##
## Operating Systems
##

    os.apple=Mac OS X
    os.unix=Linux,FreeBSD,Solaris,SunOS
    os.windows=Windows 95,Windows 98,Windows NT,Windows 2000,Windows 2003,Windows XP,Windows Vista,Windows 7

##
## Plugins
##

    #
    # Set the excludes and includes attributes. These attributes are read when
    # you run "ant" from the layouttpl, portlets, or themes directory. By
    # default, the ant task will go through every subdirectory. Setting these
    # attributes can limit it to just the plugins you're working on.
    #
    plugins.excludes=
    plugins.includes=*

##
## SVN
##

    svn.enabled=false

##
## Version
##

    #
    # Set the version of Liferay Portal that these plugins are designed for.
    #
    lp.version=6.0.6

- In this file lines starting with # are comments and non-commented line represents properties for build Liferay Plugins
- You need to set following properties based on you application server

 
    app.server.type
    app.server.dir
    app.server.deploy.dir
    app.server.lib.global.dir
    app.server.portal.dir

Which is configured by default for Liferay with Tomcat Application server as follows:

 
    app.server.type=tomcat
    app.server.dir=${project.dir}/../bundles/tomcat-6.0.26
    app.server.deploy.dir=${app.server.dir}/webapps
    app.server.lib.global.dir=${app.server.dir}/lib/ext
    app.server.portal.dir=${app.server.dir}/webapps/ROOT

For Liferay with tomcat application server you need to change only app.server.dir to point to tomcat directory of Liferay portal and every thing works well. In my case I installed liferay-portal-6.0.6 with Tomcat 6.0.26 at c:\liferay, hence I will set value of app.server.dir to c:/liferay/liferay-portal-6.0.6/tomcat-6.0.26 and the changed values in build properties files should look like:

 
    app.server.type=tomcat
    app.server.dir=c:/liferay/liferay-portal-6.0.6/tomcat-6.0.26
    app.server.deploy.dir=${app.server.dir}/webapps
    app.server.lib.global.dir=${app.server.dir}/lib/ext
    app.server.portal.dir=${app.server.dir}/webapps/ROOT


Note: Always user "/" for specifying path in build.properties file even if you are working on Windows platform.

Also build properties file has commented lines which contains properties need to be set for other application servers, you can comment the default configuration properties for tomcat and remove comments for the required application server and also need to set correct value of app.server.dir to home directory of your application server.
e.g For Liferay with JBOSS, I will comment all the line with tomcat configuration and uncomment JBOSS related configuration and modify them as follows:

# JBOSS related configuration
    app.server.type=jboss
    app.server.dir=c:/liferay/liferay-portal-6.0.6/jboss-5.1.0
    app.server.deploy.dir=${app.server.dir}/server/default/deploy
    app.server.lib.global.dir=${app.server.dir}/server/default/lib
    app.server.portal.dir=${app.server.dir}/server/default/deploy/ROOT.war

# commented original configuration for tomcat
    #app.server.type=tomcat
    #app.server.dir=${project.dir}/../bundles/tomcat-6.0.26
    #app.server.deploy.dir=${app.server.dir}/webapps
    #app.server.lib.global.dir=${app.server.dir}/lib/ext
    #app.server.portal.dir=${app.server.dir}/webapps/ROOT


Similarly you can change build properties file for different application servers.
Share |

Setting up Liferay Portal on your machine | Installing Liferay Portal

Share |
To begin with I will share first tutorial which explains, how to get your machine ready to work with Liferay.

You can download Liferay from http://www.liferay.com/downloads/liferay-portal/available-releases
Liferay Portal by default comes packed with following application servers
- Liferay with Tomcat
- Liferay with JBOSS
- Liferay with Geronimo
- Liferay with GlashFish
- Liferay with JOnAS + Tomcat
- Liferay with Jetty
- Liferay with Resin
Additional to this you can download WAR file for Liferay portal and deploy it on any other Application / Web Server.
You can download Liferay with any of your favorite Application / Web Server and extract ZIP file at any of your desired location which you should call Liferay bundle location.

Note: All of the bundles ship with a Java Runtime Environment for Windows 32 bit; if you have any other operating system then you must have installed a JDK (Java Development Kit) prior to launching Liferay

If you have downloaded a zip file for Liferay with Tomcat and you extracted it at "c:\liferay" then the directory structure should look like as follows:
c:\liferay\liferay-portal-<liferay version>
-- c:\liferay\liferay-portal-<liferay version>\readme.html

-- c:\liferay\liferay-portal-<liferay version>\data
Data:
This folder is used to store the embedded HSQL database which the bundles use, as well as the configuration and data for the Jackrabbit JSR-170 content repository and the Lucene search index.

-- c:\liferay\liferay-portal-<liferay version>\tomcat->tomcat version>
[Application Server]: There will also be an application server folder which is different depending on which bundle you have downloaded. This folder contains the application server in which Liferay has been installed.

-- c:\liferay\liferay-portal-<liferay version>\license
License: Contains both Liferay's license and a file which describes the licenses for many of the other open source projects that are used internally by Liferay.

-- c:\liferay\liferay-portal-<liferay version>\deploy
Deploy: Plugins which you wish to deploy to Liferay can be copied into this folder. It is also used by Liferay's graphical plugin installer utility, which is available from the Control Panel.

You can start Liferay by starting tomcat server or any other Web / Application server part of Liferay installation.
For example, to start liferay with tomcat go to <Liferay Bundle Location>\<tomcat directory>\bin and run startup.bat on windows platforms and startup.sh for Unix platforms
To stop run shutdown.bat on windows platforms shutdown.sh for Unix platforms.

When you start Liferay by default it runs on default port of the Application / Web Server. For tomcat it runs on 8080. You can access the Liferay by visiting "http://localhost:8080" from your web browser.

By default when you visit "http://localhost:8080" after starting Liferay, it shows the welcome page

You can click on Sign in to sign in into Liferay portal. By default Liferay creates super admin user with test@liferay.com with password: test
 
When you login first time with any user it will ask you to agree terms of use and password recovery question.

After login you can create pages, add portlets to page, customize the layout of the page and many more.

Share |

Liferay Introduction - Editions of Liferay

Share |
Liferay Portal is one of the most flexible applications with regard to application server environment on the market today. You can install Liferay Portal on everything from a shared Tomcat installation to a multi-nodecluster running a commercial application server, and on everything in between. In fact, Liferay is used successfully in all of these scenarios every day.

Editions of Liferay
Liferay comes with different editions: Liferay Portal Community Edition (CE) and Liferay Portal Enterprise Edition (EE). CE is the Liferay Portal which is frequently updated and bursting with the latest features, the Community Edition of Liferay Portal is offered for free under the Lesser GNU public license, an open source license. This license gives you the flexibility to link Liferay with your own code in your portlet, theme, hook, layout, Ext, or web plugins, no matter what license you use for your code. If, however, you modify Liferay directly, those modifications need to be contributed back to the open source product. This is really the best of both worlds: you have the freedom to do what you want with your code, and Liferay receives the benefits of any enhancements that are made directly.
Liferay Portal EE is a supported version of Liferay Portal for the enterprise. Hardened for security and designed to be rock solid stable, EE is offered with a subscription and support package, allowing organizations to build their portals on a stable version of the product that is offered over an extended period of time. Because the release cycle for EE is longer than that for CE, each enterprise release is supported for 4 years. All bug fixes in Liferay Portal are backported to your version of Liferay for the duration of your subscription. This gives organizations the peace of mind that comes from knowing that their Liferay-powered web sites are stable and will run for years to come, enabling them to build their sites on a proven, stable platform. Additionally,
Liferay's professional services team offers training and consulting on the  Enterprise Edition to ensure long-term support and stability for our clients.

Share |