It is very simple to create, deploy and customize the portlet in Liferay. Before you start working on portlet with Liferay please make sure you have installed JDK, ANT, Liferay portal and Liferay Plugins SDK on your machine.
Create and Deploy portlet with Liferay Plugins SDK: (Step by Step guide to Create and Deploy portlet using Liferay Plugins SDK)
- Go to <Liferay Plugins Install Directory>/portlets and give following command to create portlet
For Linux, Unix and Mac OS X:
For all windows platforms:
- This will create portlet plugin in directory-porltet e.g. if portlet name is hello-world then hello-world-portlet directory will be created in <Liferay Plugins Install Directory>/portlets directory
- To deploy the portlet go to newly created portlet's directory in command prompt / terminal and give following command
- Note: make sure your Liferay portal is running at this time or else you can start it, to see the deployed portlet.
- By default newly created portlets gets added to Sample category, you can add this portlet to any page of the Liferay.
If you are facing problem in creation or deployment of portlet then please visit "How to create and deploy Liferay portlet using Liferay plugins SDK?" here
Understanding directory structure and various files of Portlet Project
A portlet project is made up at a minimum of three components:
1. Java Source
2. Configuration files
3. Client-side files (*.jsp, *.css, *.js, graphics, etc.)
These files are stored in a standard directory structure which looks
like the following:
1) liferay-display.xml : User add portlet into specific category in portlet catalog
2) liferay-portlet.xml: Liferay specific extensive configuration of portlet
3) liferay-plugin-package.properties: User by Liferay hot deployer for plugins.
Note: To read more details about directory structure of Liferay portlet project visit here
Following are default configuration files for Hello World portlet
portlet.xml
liferay-portlet.xml
liferay-display.xml
liferay-plugin-package.properties
view.jsp
We can remove or customize copyright javadoc message to as per our requirements or remove it. Other than this there will be two empty files created at docroot/js/main.js for adding custom javascripts and docroot/css/main.css to specify custom css configurations.
Customizing Portlet
You can download the portlet project for the hello world example here and extract this to portlets directory of your plugin.
Create and Deploy portlet with Liferay Plugins SDK: (Step by Step guide to Create and Deploy portlet using Liferay Plugins SDK)
- Go to <Liferay Plugins Install Directory>/portlets and give following command to create portlet
For Linux, Unix and Mac OS X:
./create.sh <portlet-name> "portlet display name"
For all windows platforms:
create.bat <portlet-name> "portlet display name"
- This will create portlet plugin in directory
- To deploy the portlet go to newly created portlet's directory in command prompt / terminal and give following command
ant deploy
- Note: make sure your Liferay portal is running at this time or else you can start it, to see the deployed portlet.
- By default newly created portlets gets added to Sample category, you can add this portlet to any page of the Liferay.
If you are facing problem in creation or deployment of portlet then please visit "How to create and deploy Liferay portlet using Liferay plugins SDK?" here
Understanding directory structure and various files of Portlet Project
A portlet project is made up at a minimum of three components:
1. Java Source
2. Configuration files
3. Client-side files (*.jsp, *.css, *.js, graphics, etc.)
These files are stored in a standard directory structure which looks
like the following:
/<portlet-name>/
                     build.xml
                     /docroot/
                     /css/
                     /js/
       /tld/
                     /WEB-INF/
                             /src/ (not created by default)
                             liferay-display.xml
                             liferay-plugin-package.properties
                             iferay-portlet.xml
                             portlet.xml
                             web.xml
                      icon.png
                      view.jsp
New portlets are configured by default to use the MVCPortlet framework, which uses separate JSPs for each page in the portlet, and for each of the three portlet modes: view, edit, and help. The Java Source is stored in the docroot/WEB-INF/src folder. The Configuration Files are stored in the docroot/WEB-INF folder. The standard JSR-286 portlet configuration file portlet.xml is here, as well as three Liferay specific configuration files:
1) liferay-display.xml : User add portlet into specific category in portlet catalog
2) liferay-portlet.xml: Liferay specific extensive configuration of portlet
3) liferay-plugin-package.properties: User by Liferay hot deployer for plugins.
Note: To read more details about directory structure of Liferay portlet project visit here
Following are default configuration files for Hello World portlet
portlet.xml
<?xml version="1.0"?>

<portlet-app version="2.0" xmlns="http://java.sun.com/xml/ns/portlet/portlet-app_2_0.xsd" xmlns:xsi="http://www.w3.org/2001/XMLSchema-instance"
    xsi:schemaLocation="http://java.sun.com/xml/ns/portlet/portlet-app_2_0.xsd http://java.sun.com/xml/ns/portlet/portlet-app_2_0.xsd">
    <portlet>
        <portlet-name>hello-word</portlet-name>
        <display-name>Hello World</display-name>
        <portlet-class>com.liferay.util.bridges.mvc.MVCPortlet</portlet-class>
        <init-param>
            <name>view-jsp</name>
            <value>/view.jsp</value>
        </init-param>
        <expiration-cache>0</expiration-cache>
        <supports>
            <mime-type>text/html</mime-type>
        </supports>
        <portlet-info>
            <title>Hello World</title>
            <short-title>Hello World</short-title>
            <keywords>Hello World</keywords>
        </portlet-info>
        <security-role-ref>
            <role-name>administrator</role-name>
        </security-role-ref>
        <security-role-ref>
            <role-name>guest</role-name>
        </security-role-ref>
        <security-role-ref>
            <role-name>power-user</role-name>
        </security-role-ref>
        <security-role-ref>
            <role-name>user</role-name>
        </security-role-ref>
    </portlet>
</portlet-app>
liferay-portlet.xml
<?xml version="1.0"?>
<!DOCTYPE liferay-portlet-app PUBLIC "-//Liferay//DTD Portlet Application 6.0.0//EN" "http://www.liferay.com/dtd/liferay-portlet-app_6_0_0.dtd">

<liferay-portlet-app>
    <portlet>
        <portlet-name>hello-word</portlet-name>
        <icon>/icon.png</icon>
        <instanceable>true</instanceable>
        <header-portlet-css>/css/main.css</header-portlet-css>
        <footer-portlet-javascript>/js/main.js</footer-portlet-javascript>
        <css-class-wrapper>hello-word-portlet</css-class-wrapper>
    </portlet>
    <role-mapper>
        <role-name>administrator</role-name>
        <role-link>Administrator</role-link>
    </role-mapper>
    <role-mapper>
        <role-name>guest</role-name>
        <role-link>Guest</role-link>
    </role-mapper>
    <role-mapper>
        <role-name>power-user</role-name>
        <role-link>Power User</role-link>
    </role-mapper>
    <role-mapper>
        <role-name>user</role-name>
        <role-link>User</role-link>
    </role-mapper>
</liferay-portlet-app>
liferay-display.xml
<?xml version="1.0"?>
<!DOCTYPE display PUBLIC "-//Liferay//DTD Display 6.0.0//EN" "http://www.liferay.com/dtd/liferay-display_6_0_0.dtd">

<display>
    <category name="category.sample">
        <portlet id="hello-word" />
    </category>
</display>
liferay-plugin-package.properties
name=Hello World
module-group-id=liferay
module-incremental-version=1
tags=
short-description=
change-log=
page-url=http://www.liferay.com
author=Liferay, Inc.
licenses=LGPL
view.jsp
<%
/**
 * Copyright (c) 2000-2010 Liferay, Inc. All rights reserved.
 *
 * This library is free software; you can redistribute it and/or modify it under
 * the terms of the GNU Lesser General Public License as published by the Free
 * Software Foundation; either version 2.1 of the License, or (at your option)
 * any later version.
 *
 * This library is distributed in the hope that it will be useful, but WITHOUT
 * ANY WARRANTY; without even the implied warranty of MERCHANTABILITY or FITNESS
 * FOR A PARTICULAR PURPOSE. See the GNU Lesser General Public License for more
 * details.
 */
%>

<%@ taglib uri="http://java.sun.com/portlet_2_0" prefix="portlet" %>

<portlet:defineObjects />

This is the <b>Hello World</b> portlet.
We can remove or customize copyright javadoc message to as per our requirements or remove it. Other than this there will be two empty files created at docroot/js/main.js for adding custom javascripts and docroot/css/main.css to specify custom css configurations.
Customizing Portlet
- Make sure instanceable property is set to true for hello-world portlet in liferay-portlet.xml.
- Now, we want customize portlet for user to input the customized greeting message in the edit mode of the portlet and in view mode it should display greeting message to that user.
- For this, change the content of view.jsp as follows:
<%@ taglib uri="http://java.sun.com/portlet_2_0" prefix="portlet" %> <%@ page import="javax.portlet.PortletPreferences" %> <portlet:defineObjects /> This is the <b>Hello World</b> portlet. <br/> <% PortletPreferences prefs = renderRequest.getPreferences(); String greeting = (String)prefs.getValue("greeting", "Hello! Welcome to our portal."); %> <p><%= greeting %></p> <portlet:renderURL var="editGreetingURL"> <portlet:param name="jspPage" value="/edit.jsp" /> </portlet:renderURL> <p><a href="<%= editGreetingURL %>">Edit greeting</a></p> - Next, create edit.jsp in the same directory as view.jsp with the following content:
<%@ taglib uri="http://java.sun.com/portlet_2_0" prefix="portlet" %> <%@ taglib uri="http://liferay.com/tld/aui" prefix="aui" %> <%@ page import="com.liferay.portal.kernel.util.ParamUtil" %> <%@ page import="com.liferay.portal.kernel.util.Validator" %> <%@ page import="javax.portlet.PortletPreferences" %> <portlet:defineObjects /> <% PortletPreferences prefs = renderRequest.getPreferences(); String greeting = ParamUtil.getString(renderRequest, "greeting"); if (Validator.isNotNull(greeting)) { prefs.setValue("greeting", greeting); prefs.store(); %> <p>Greeting saved successfully!</p> <% } %> <% greeting = (String)prefs.getValue("greeting", "Hello! Welcome to our portal."); %> <portlet:renderURL var="editGreetingURL"> <portlet:param name="jspPage" value="/edit.jsp" /> </portlet:renderURL> <aui:form action="<%= editGreetingURL %>" method="post"> <aui:input label="greeting" name="greeting" type="text" value="<%=greeting %>" /> <aui:button type="submit" /> </aui:form> <portlet:renderURL var="viewGreetingURL"> <portlet:param name="jspPage" value="/view.jsp" /> </portlet:renderURL> <p><a href="<%= viewGreetingURL %>">← Back</a></p> - After this once again deploy the portlet by going to portlet project directory (portlet/hello-world-protelt) at command prompt and execute command ant deploy
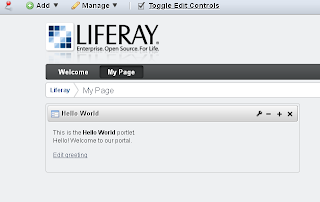
- Now check the portal's console once it logs that portlet is deployed successfully. Go to browser and add our Hello World portlet form Sample category to page, which is displayed as follows
- You can click on edit greeting link and view the page to change the greetings message.

- Here change your customized greetings message then click on Save button. Which saves the customized greeting message and then click on the back link to switch back to view mode of portlet.Now you can see the custom greeting message as follows:


You can download the portlet project for the hello world example here and extract this to portlets directory of your plugin.
No comments:
Post a Comment